The Insight altimeter provides features to mark your intended Landing Zone (LZ) using latitude and longitude coordinates. This allows real time display of the distance to the LZ during the plane ride, spotting and even in freefall and under canopy. Display features such as LZ glide, distance to LZ, and turn to LZ require the LZ coordinates to be set.
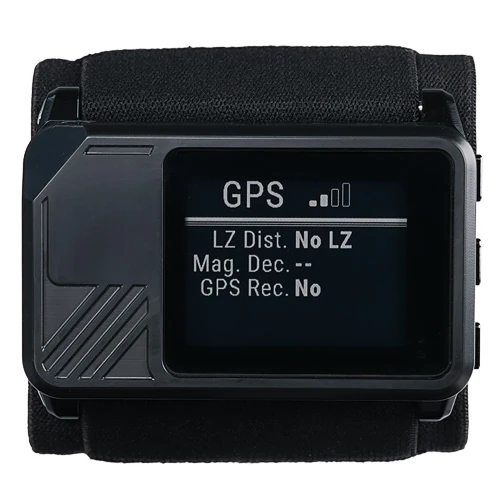
Insight main GPS screen
GPS Markers #
The Insight can store up to 100 LZ markers. Each marker is named for easy identification and stores the coordinates just like any other modern GPS navigation system.
To activate a marker for use as the LZ, navigate to the Marker List in the menu, and open the LZ marker. Select the Active LZ: field from the menu to toggle the marker on/off as the active LZ. Always select Save from the menu when making any changes to a LZ marker or your changes will be lost when you exit this menu.
Only 1 marker can be “active” at a time. The active LZ marker will be used to calculate features such as LZ glide, distance to LZ, and turn to LZ on your next skydive.
Add/Edit a Marker #
When adding a new marker, or editing an existing marker, the following options are available:
Save #
This option saves the new marker (when adding) or saves any changes made to the marker (when editing an existing marker). Always select save to ensure you changes are recorded to the marker.
Using any other method to exit this menu will not save your changes.
Coords #
Enter the latitude and longitude coordinates by hand. These coordinates are entered in decimal degrees format.
You must use the center button to advance through all of the coordinate entry fields to exit this screen. Exiting the screen before advancing through each field will not save the new coordinate value.
If you only have a street address or lat/lon in a different format than decimal degrees, use this GPS coordinate converter.
Name #
Enter the name for this marker. The main marker list is sorted alphabetically.
Mark Here #
This screen allows saving your current coordinates to the marker.
Tips:
- To assist the GPS signal, stand in a clear area with no overhead obstructions within a 20 foot radius.
- It may take up to 5 minutes for the GPS to acquire your location for the first time.
- Stand at your desired landing point when marking the LZ to have the most accurate distance reporting from the LZ while on jumprun.
Once the GPS has a good signal it will display the current location (latitude and longitude values) using the decimal degrees format, as well as your MSL (mean sea level) altitude. You can select “save” to store these coordinates to the marker, or “cancel” to exit this screen without updating the marker’s coordinates.
Delete Marker #
Remove the LZ marker from your marker list. If the marker was being used as the “Active LZ”, that information will also be cleared from memory.
Active LZ #
Sets the current marker as the “Active LZ”. Always select Save from the menu when making any changes to an LZ marker or your changes will be lost when you exit this menu.
Only 1 marker can be “active” at a time. The active LZ marker will be used to calculate features such as LZ glide, distance to LZ, and turn to LZ on your next skydive.
The Active LZ marker will be shown on the main GPS screen in the “LZ” section. Always check the name and distance to the LZ shown on this screen, to ensure you have selected the correct LZ marker for your next skydive.


